User management is a structuring aspect of the tool: the ability to manage users' access rights, their teams, and the possibility of giving them roles within the tool. This feature is only available to Administrators, and the first Administrator is the one who assigns admins and users.
These are the different actions related to user management:
- Add a user
- Modify a user
- Delete a user
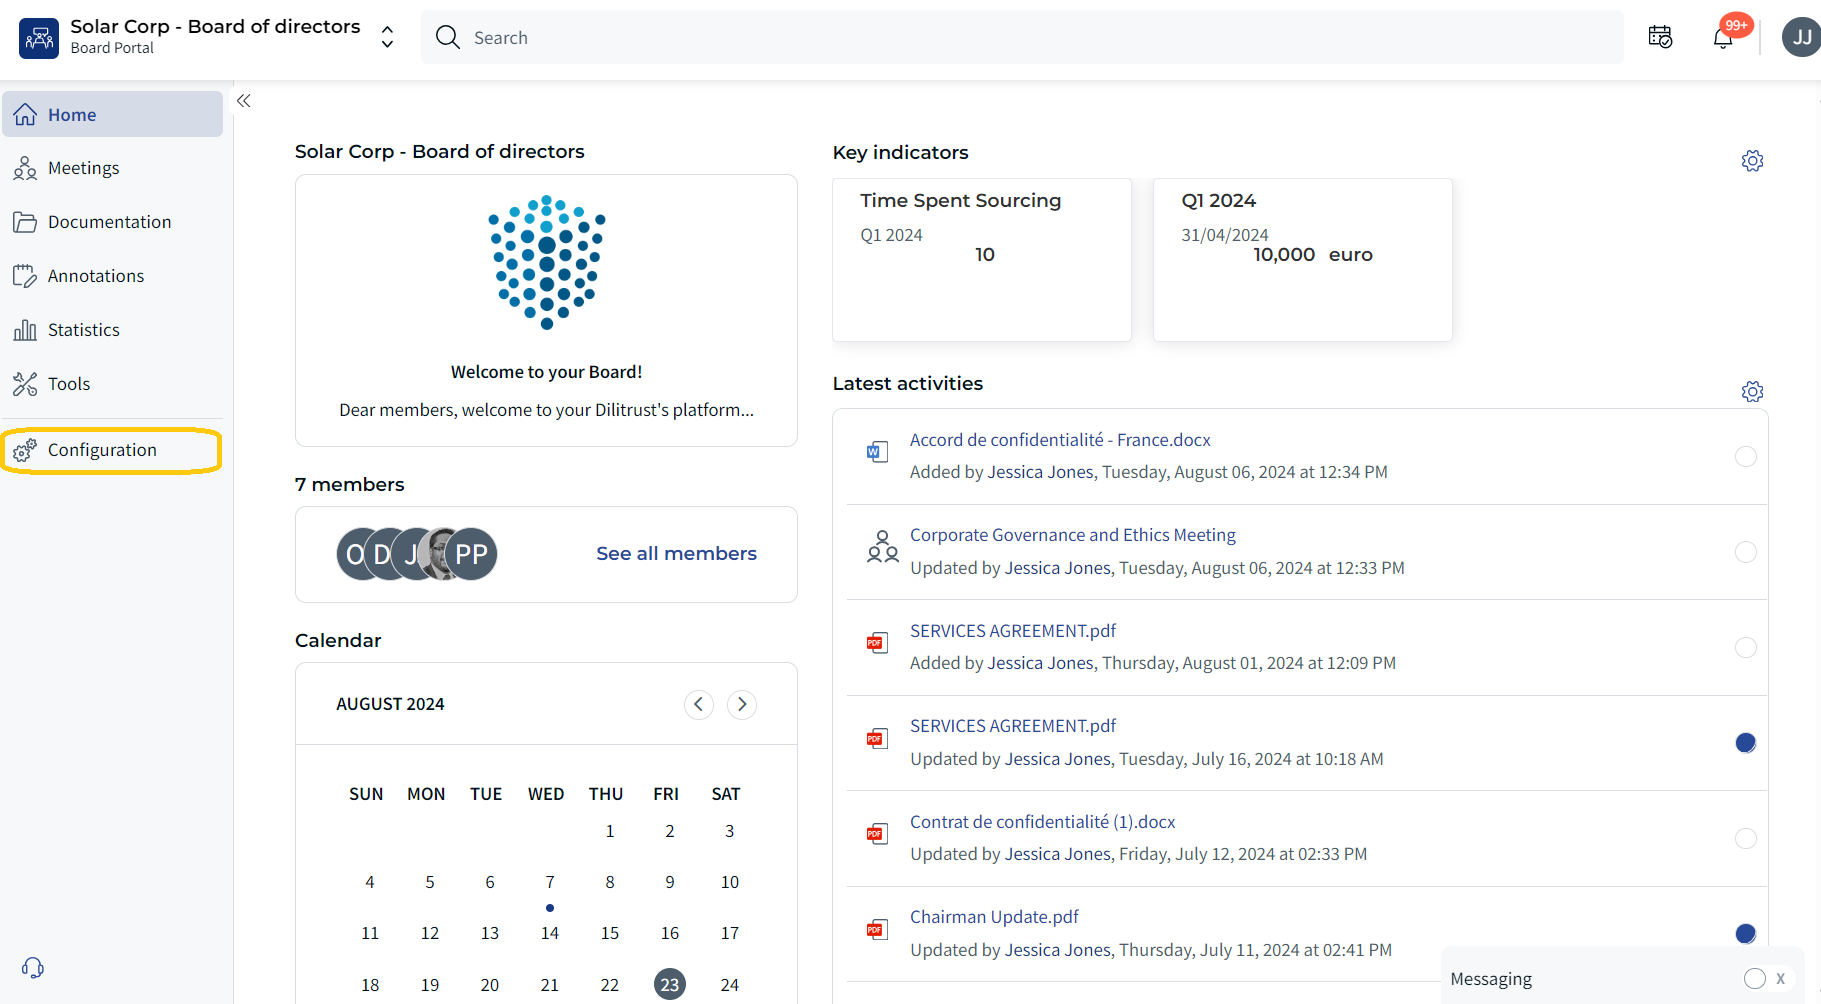
You can access the "User access management" tab in the Configuration tab in the thumbnail.
☝ Before you start: what's new with user activation
We've introduced an important security improvement to how users gain access to new environments. Please read this before adding users so you know exactly what to expect.
- What's changing? When an existing user is added to a new module or tenant, their account now defaults to Suspended instead of Active.
- What happens next for the user? They will receive an activation email containing a confirmation link. This link is valid for 24 hours and unlocks their access to the new module.
- Why? This is a deliberate security enhancement: users now explicitly confirm their intent before gaining access to a new environment, helping keep your organization's data protected.
In short: adding an existing user no longer grants instant access. The user must confirm via email first.
✍ Add a user
To add a user:
- Click on "Add a user" at the top right of the screen.
- Next, complete the form that appears, choosing between manual entry or Excel file import.
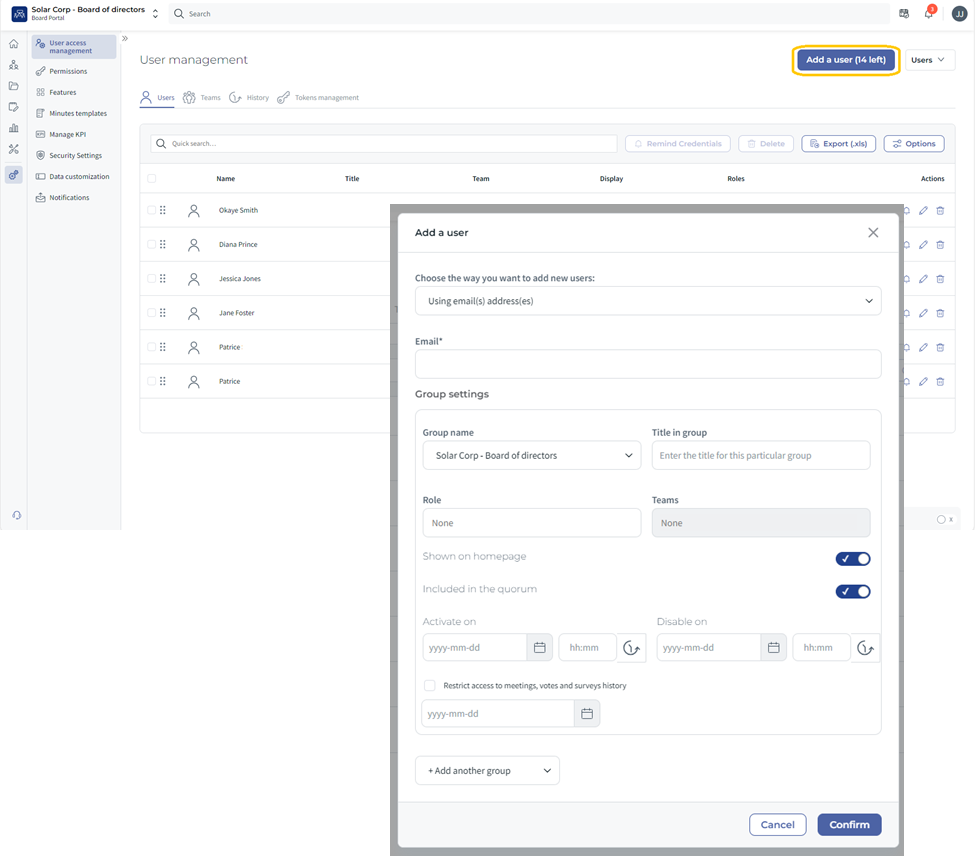
For manual entry:
- Start with the user's email, select the applicable Board/Committee group (if you are an Administrator for more than one group), and optionally assign a Group title.
- Designate the user as an Administrator or keep them as a User with limited permissions.
- Choose visibility options such as "Shown on homepage" and "Included in the quorum" by checking or unchecking the box on the right. The quorum section will allow the user to see and confirm their presence at meetings.
- Set an activation date to determine when the user will have access to the group, and/or a deactivation date to restrict access beyond a certain date. You can leave the deactivation date blank for immediate and indefinite access.
- Optionally restrict access to past meetings, votes, and surveys by specifying a date.
- Click "Confirm".
Next, you will be redirected to another form to re-enter their email, first name, and last name. The other fields will autofill from the previous form. Then click on "Confirm".
NB: For existing users on the platform, information from their profile will automatically be added at the second step. We recommend that you use the email address already in use for this user on Board Portal. This way, once added, a message will appear on the page informing you that the user already has an account on the platform, which you simply need to confirm to add them to the instance.
For new users, you can choose whether to notify them immediately or delay confirmation, blocking access until ready.
Good to know: If your user has access to several of your instances, you can add them to several groups when creating the user. To do so, simply click on "Add another group".
✅ Activating access to a new module or tenant
When you add an existing user to a new module or tenant, their access starts in a Suspended state. Here's what happens next:
- The user automatically receives an activation email with a confirmation link.
- The user clicks the link to confirm their intent and unlock access to the new environment.
- The link is valid for 24 hours. Once confirmed, the user's account becomes Active for that module.
As an Administrator, it's a good idea to let the user know an activation email is on its way, so they can complete this quick step without delay.
⏳ What happens if the 24-hour window expires?
If the user does not confirm within 24 hours, the activation link will expire and access will remain Suspended. In that case:
- The Administrator simply needs to re-trigger the invitation to send a fresh activation email.
- The new link will again be valid for 24 hours.
✨ Tips & Best Practices
- Tell users in advance to expect an activation email when you add them to a new module or tenant.
- Ask users to check their spam or junk folder if they don't see the email shortly after being added.
- Encourage users to confirm promptly — within the 24-hour window — to avoid having to re-send the invitation.
- Use the email address the user already has on the platform to ensure their existing profile information is recognized.
⛔ Limitations & Known Constraints
- The activation confirmation link is valid for 24 hours only. After that, it must be re-triggered.
- Until the user confirms, their access to the new module or tenant remains Suspended — they cannot access the environment.
- This activation step applies when an existing user is added to a new module or tenant.
❓ FAQ
Why is the user's account Suspended after I add them?
This is an intentional security improvement. Users must now explicitly confirm their intent before gaining access to a new environment. Once they click the confirmation link, their access becomes Active.
The user didn't receive the activation email. What should I do?
Ask them to check their spam or junk folder first. If it still hasn't arrived or the 24-hour window has expired, simply re-trigger the invitation from the user management screen to send a new email.
How long is the activation link valid?
The link is valid for 24 hours from the moment the user is added. After that, it expires and a new invitation must be sent.
What happens if the 24-hour window expires?
The link will no longer work and access stays Suspended. As an Administrator, you just need to re-trigger the invitation to issue a fresh 24-hour link.
Does this apply to brand-new users too?
This change specifically governs how existing users gain access when added to a new module or tenant. For new users, you can still choose whether to notify them immediately or delay confirmation.
Was this article helpful?
That’s Great!
Thank you for your feedback
Sorry! We couldn't be helpful
Thank you for your feedback
Feedback sent
We appreciate your effort and will try to fix the article